Adjusting the mirrors
It never ceases to amaze me who many people don't know how to properly adjust the rearview mirrors on their cars. These people then proceed to complain about the awful blind spots they claim their cars have. The mirrors in the Esprit offer an excellent field of view when set properly and help overcome some of the visibility limitations caused by the giant rear wings on some models. The key is to set the mirrors in a wider pattern than you might be accustomed to.
People often make the mistake of adjusting the door mirrors so they can see the side of their car. What you must realize is that any portion of the mirror's field of view dedicated to seeing the side of the car is limiting the total amount of field of view available for seeing objects besides your car. The door mirrors on the Esprit have a base that allows the housing to swivel to three different positions. The innermost position is for tucking in the mirrors when loading the car into narrow confines such as on a car carrier/transporter. You should never use the middle detent position because this does not allow the mirror glass to swing out wide enough and this limits your field of view. Swing the mirror body out to the outermost detent. You can then start adjusting your driver side mirror glass out so that, while your head is facing straight ahead in a normal driving position, so that the side of the car just disappears from the view in the mirror. Repeat the same process with the passenger door mirror. The interior rearview mirror should be set in such a way that vehicles disappearing from its left or right are simultaneously starting to appear on the corresponding door mirror. If this cannot be achieved by adjusting the center mirror alone, adjust the door mirrors accordingly until this is so.
I suggest you try this technique and you will see that the blind spots you were so accustomed to are almost non-existent.
Replacing Door Mirror Glass
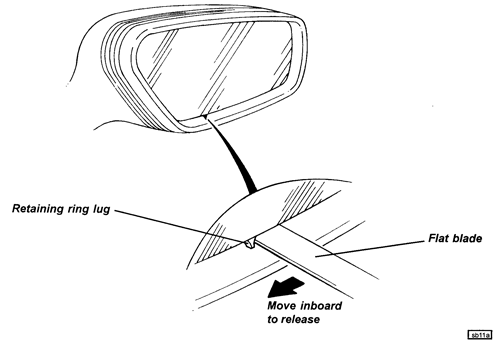
1. To remove the glass and carrier assembly from the mirror body, use a thin flat blade inserted between the bottom of the glass and the casing, and press the lug on the glass retaining ring inboard. Withdraw the glass and carrier from the adjuster motor, disconnecting the two heater element wires.
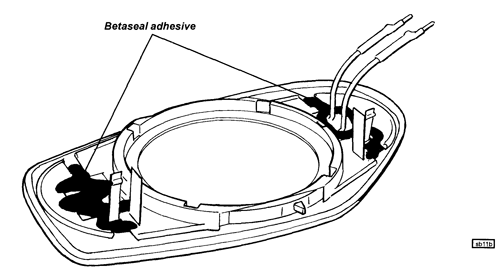
2. The glass is secured to the carrier with a double sided adhesive pad, but in order to increase the security of the glass bonding, it is recommended to apply, in addition, a mastic adhesive to the rear of the carrier over the apertures and mirror rear face at each end of the carrier as shown in the illustration. The preferred product is Betaseal 1701 adhesive (A082B6281 F), in conjunction with Betaprime 5404 (A082B6337V).
3. Refit the glass/carrier assembly to the mirror body, connecting the heater wires, and press the retaining ring lug outboard.
Replacing the Mirror Assembly
The mirror assembly is secured to a mounting plinth by a ring nut, with the plinth fixed to the door shell by two setscrews tapping into the plinth.
1. Remove the door trim panel and the door front (speaker) access panel.
2. Disconnect the mirror harness, and with the window fully raised, release the two setscrews securing the mirror plinth, and remove the assembly from the door. If necessary, remove the ring nut to release the mounting plinth from the mirror.
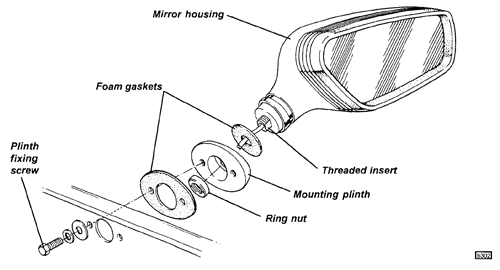
3. For access to the mirror pivot mechanism, push the plastic sleeve into the mirror housing to expose the grub screw which retains the threaded insert in the housing.
4. On re-assembly, ensure that the foam gaskets are fitted between mirror and plinth, and between plinth and door shell.